

I've seen many variations of the book page wreath on Pinterest, but after my Mom sent me a link to a Robeson Designs tutorial, I decided to give it a shot as I already had everything on hand and figured I had nothing to loose- and it was super easy and totally worth it!
My version of the tutorial is below, but definitely check Rebecca Robeson's- she did an awesome job
Okay so start out with a nice vintage book. One you won't feel so awful destroying (that is the difficult part). I got this book for free, but many old books can be found at Salvation Army, Goodwill, yard sales, or library sales for a dollar or less.
My book was from 1959, it had a nice vintagey feel to the pages, the edges were starting to yellow and the binding was barely intact.

First rip off the cover, the binding, and start (neatly) tearing away pages I could do this about 20 at a time by hand

In her tutorial Rebecca trims all of her pages with scissors because she has rough edges, I'm assuming this was because she used an older book. My edges weren't completely smooth but it wasn't worth trimming, I was going for an imperfect look anyway. If you choose an older book with tighter binding you might need to cut away some.

Start rolling out your cones! I was going to give detailed instructions on how to do this but it didn't seem worth it. Rebecca does a good job describing it so you can follow her instructions or just try to roll your own cone. I just winged it and it came out fine. I stapled the bottom and placed a dot of hot glue at the top to hold the flap in place.
Repeat a million times

When you think you've made enough you probably haven't. Hah. I stopped here and later found out I needed to make more. I probably made about 200 cones.
So for the back support of my wreath I used left over cardboard. I traced two plates to make my circles, 10 inches and 6 inches. You could go larger or smaller to a make different size wreath.


I marked my circles at 12,3,6,and 9. You should also measure and mark your center! I did not and my wreath was off center because of it! Mark your center

Trim your cardboard down and starting with the outer circle hot glue a cone on each of your marks. I placed my staple on the line.

Now fill in between each cone

Once you've made it all the way around its time to make another layer on top, gluing this layer slightly closer to the center

Use your circles as a guide to keep center. Repeat until full

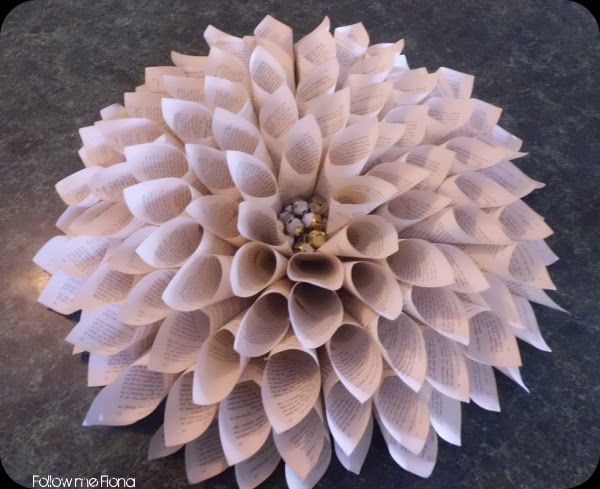
Isn't it glorious already?

For the center I used a 16 pack of silver and gold jingle bells from the dollar store that I had on hand. I put a bunch of hot glue on the bottom and stuck them in there and then just stacked more on top until I thought it looked full enough
Little ornaments or beads would look good here too, you can really put whatever you like in the center

To hang it I used a simple binder clip and clipped it to my cardboard

I used a cheap suction cup that I had in my junk drawer to stick it to my mirror
That's it!


Cost Breakdown-
Book - free ($1 or less to buy old book)
Cardboard backing- free (use left over cardboard from old box)
Bling for center - $1 (this can obviously vary)
Hot Glue sticks- 20 cents? I used 4 sticks I think, I had them on hand so it was free to me
Staples- 30 cents? Again, I had them on hand
I'm calling this an even two dollars for posterity.
I hope you enjoyed my tutorial, happy crafting!
Linking up to Shabby Love Uncommon Designs DIY by Design The Dedicated House All Things Christmas DIY Showoff Must Love Junk Junk Chic Cottage Organized Clutter Shabby art boutique
This is the prettiest DIY wreath I've seen....I just love it and will pin so I can make one next year.
ReplyDeletexo bj
Thank you! I'm so glad you liked it! :)
DeleteLove the wreath and the simplicity in your instructions. Can't wait to make one.
DeleteThis is the prettiest wreath I've ever seen. I think it can be displayed year round. LOVE IT!
ReplyDeleteThank you! I think I might make another one without jingle bells in it and putting in something else shiny. It was so easy and inexpensive to make it will make switching in this Christmas one special
DeleteOh, I love your wreath! It's so full and pretty! Thanks for linking up :)
ReplyDeleteSusan
Thank you for hosting! Love your blog, everything on it is gor-geous!
DeleteBrilliant!
ReplyDeleteThank you!
DeleteYour wreath is stunning ~ and the price is perfect! Your tutorial is awesome. I must pin and try this! Thanks for sharing with us at our holiday décor link up! Kim @ Exquisitely Unremarkable
ReplyDeleteThanks for pinning, glad you liked it :) !
DeleteWhat a gorgeous wreath... thank you for linking up at Shabbilicious Friday.
ReplyDeleteI'm featuring today at Shabbilicious Friday :)
ReplyDeleteThank you so much for featuring me!!!! My very first feature! I'm so excited :)
DeleteThanks for the tutorial - I made one in about an hour. One thing I did differently was to use a paper plate for the backing.
ReplyDeleteI'm so glad you were able to make one! Mine took about 3 hours haha so kudos on your time frame!
DeleteYour wreath is beautiful. Thanks for linking up to DIYbyDesign. I will be featuring this tonight at my Fall into Fall party that opens at 8pm EST. Please stop by and pick up an I've Been Featured button. Thanks. http://diybydesign.blogspot.com
ReplyDeleteThank you so much for featuring!!
Deletegreat job on your version and i love your center jingle bells it looks stunning
ReplyDelete