Thursday, June 7, 2012

Garbage painting

So this post is totally me being way too excited about a painting my husband scored for free
That's right - free!

For those of you who don't know, my husband drives a garbage truck. Which means he has access to lots of "treasures" aka hoarding crap to put in his future man cave (usually)

But here's what he got for me this week! A Monet reproduction with a beautiful ornate frame! Um seriously, who would throw this out? 


The light in the corner is from the flash, the painting has no defects!
It had a small yard sale sticker on the side of it that said $5, I would have gladly paid five dollars, but I didn't have to :)


Check out the details on the frame!


Just for some juxtaposition, my husband also got me this out of the trash on the same day. Proving he has no idea what I like haha


Not my style, although it matches the wall color

At least he tries, can't complain about that :)  Love you Richard


 Fiona wearing Daddy's hat, too cute


If you're wondering where the framed picture that my sister drew is, don't worry it just migrated into the dining room. Everything's been rotating lately as we're packing up to move! More details to come after we close, don't want to jinx it!

How to clean wax from candle holders

So many times I've used a candle holder with a bright colored candle and 'ruined' it with leftover wax. Afterwards I would get all sad and think "well guess I can only use [insert color here] candles from now on." I did this to like 7 different candle holders last Christmas when I used red candles. That was until I discovered a great way to clean them!

In the past I've used a butter knife to scrape out stubborn wax after burning a candle, but the holders were never completely clean, until now!

This is SO easy, and it only takes a minute!


Here's my dirty candle holder. complete with burnt on wick and lime green wax residue.

To get rid of the gunk, boil some water, I used my teapot.

  
Once it started whistling I poured the water in the holder and filled it up to the top

Let it sit for 30 seconds and bring all the wax and residue to the surface


You can't tell but there was green wax floating on the surface

Dump out your water! (Note: I wouldn't recommend pouring it down the sink, as the wax residue will harden and can cause clogs over time)


Wipe out any remaining wax with a paper towel, it will slide right off :)
You may have to add more water and do it again if you have a lot of left over wax

Clean!

Check out the before and after!


Hooray! Ready for a new candle!


p.s. here's a cute picture of Fi playing with Athena just because


Happy cleaning :)


Linking up to House of Hepworths, Momnivores Dilemma saved by love creations  A bowl full of lemons

Monday, April 16, 2012

DIY Mercury Glass

I know I'm late on the whole mercury glass trend, but I just discovered it and I had to make a post about it!
It's so inexpensive to make compared to buying actual mercury glass products.
Here are some inspiration pics...

 Ahhh....

Ohhh...


Here's the how to!

To make your glass, you will need Krylon's Looking Glass paint.


I bought mine from Walmart for about $8, which is the cheapest place I've found it. It's also sold at craft stores and home improvement stores.

You will also need a mixture of one part water to one part vinegar in a spray bottle. I bought this small bottle at the dollar store.


First start by giving your glass a very light spray of the paint. This is not like regular spray paint, you have to be patient and do many light coats. If your like me this will be very hard because you'll want to spray the crap out of it so you can see the results, but it just pools up and dries really slow if you spray too much. The paint sprays very runny and smells like gross strong nail polish remover. Make sure you do this outside or in a well ventilated area, this stuff STINKS! If you spray too much you will get some drip lines, like I did. But it's okay because its just the first layer and you will be doing several more.


Recognize this vase? It's from my knock off Country Door post, I wasn't finished with it! Also, don't judge my work space. It's covered in a million different kinds of spray paint and looks icky.

When using this paint you have to spray the opposite side that you want to have a mirror effect, therefor the inside of this vase was sprayed. Because it is kind of oddly shaped, it was a little difficult to evenly spray into. I had to over-spray it a little and spin it around a few times to get it to coat the bottom half. Glasses with straight lines are much easier to work with, like hurricanes.

Once you get your first thin layer of paint on your glass and it's dried for a couple of minutes, give it a squirt of the water/vinegar solution. Just enough to let it bead up on the inside


Spray your paint right onto the wet vinegar solution on your glass. The vinegar will slightly eat away at the first layer of paint, and it will prevent your current layer of paint for sticking. It gives you a nice mottled appearance.


I repeated this step a few more times to add depth and more of a mirrory finish to the glass. 5-6 coats is recommended for a full mirror finish.

You can stop here, or you can give the glass an even more distressed look by chipping away at the paint


Spray a  microfiber cloth or paper towel with your vinegar solution. Rub in circles along the inside of the glass to chip away at the paint. Of course my hand would only go so far down into the vase, enter the baby bottle brush!


Perfect for getting into tight places! I sprayed the vase and let the water drip down to the bottom, and I gave it a rough rub with the bottle brush to chip off the paint in random places. Thanks for the idea Mom!


Here it is a little chippy
I gave it oneee more light coat of paint, without spraying any vinegar on it. Just to add a slight sheen to the empty areas. Once that was all dry I gave the inside a coat of Krylon's Clear Gloss to seal the insides and keep it from chipping anymore.
I also had some paint that I accidentally got on the outside of the vase, to remove it I sprayed the vinegar on it and did a quick scrub with a sponge and it came right off. Of course you could just tape off your vase with painters tape, but I was too lazy for that :)


Here it is on my mantle, along with two other mercury glass items I sprayed. That crack/lump in my wall is looking pretty good here! Haha! Sorry for the dark photo, I wanted you to be able to see the glow of the candles and this was the best I could do. The picture does not do them justice! They look great, and these all came from the dollar store, including the candles in them I only spend $7 total on them! (not including the spray paint, which I could probably make another 3-4 more) I think they're cute little mismatched mercury glass, and a whole lot cheaper than Ballard's or Pottery Barn's Mercury glass!

I hope you are inspired to make your own! They are so beautiful, and I wish I had some fake flowers to put inside another vase I made, I think these would look great with some spring flowers in them! Somehow I don't own any silk flowers? Huh.
Until next time!
-Kristin

Wednesday, April 11, 2012

Knock off Country Door Candlesticks

So my Mom gave me the idea for this super easy tutorial! The Country Door features lots of cute furniture and decor, but it's a little on the expensive side. Here's the example:


These candlesticks, flip them over and they are vases.. for $99.99. Yeah, okay.. $100 for upside-down vases, not even including the candles! Here is my version.. for $2. Okay, to be fair I only made two candlesticks, but even if I had made three it would have cost $3, a 97% savings!


Here are my vases from the dollar store, along with these vanilla scented candles. Here comes the one and only step... flip them over!


Top with dollar store candles


They're not exact, but close enough. You just saved 97 dollars!
 

Saturday, March 17, 2012

DIY How to Glaze Furniture - Tutorial


Glazing is such an awesome tool to have in your arsenal of DIY tricks, and it's so easy. The goal of glazing is to make your furniture, frames, nick-knacks, (whatever you want) look old and imperfect!

Here's what I'll be glazing today

Super cute lamp I was so lucky to have gotten from my Mom for free! It has been in her basement for years! It was in excellent condition, just a little dirty.

First, you'll want to wash and dry what you'll be glazing. If needed, prime and paint in your desired color. I just stuck with the white, but sprayed it again with Krylon Gloss White for a nice even finish. Here's my lamp taken apart and ready to be glazed

Baby Fi supervised the project along with Carl the caterpillar and Issac the sheep.

For the glaze I used Valspar's Clear mixing glaze, I found it in Lowes for $17. I like it because I can tint it whatever color I want. 


At Lowes they can tint a quart or gallon of glaze for you, or you can buy glaze that is already tinted.  I find having the clear allows me the freedom to make whatever color glaze I want. This quart goes a LONG way, so there's no reason to be stuck using only one shade on all my future projects.
For this lamp I wanted my glaze to be a brownish-black. So I mixed about 4 parts glaze to 1 part brown and black paint mixed together. This is a rough estimate, I did not measure it.


 Also keep in mind that when the glaze is wet it is going to appear slightly lighter than it is going to dry.

If you are using a different brand follow the manufacturers instructions for exact mixing terms, although it will probably be very similar

Latex paint is recommended to use for the tint, but I used acrylic craft paint because it is what I had on hand, and it worked just fine.

Here is the top of my lamp before I started glazing


Paint on your glaze using a regular brush. Get into the nooks and crannies you want highlighted the most

Wipe away the excess with a rag (or your husbands old (clean) sock - I swear its clean, it just looks gross lol)

Its very easy, but I made a short video to show you how I do it. I'm painting in one hand and holding the camera in the other, so the camera shakes a little, sorry :)


Yes that's Fiona cooing in the background

If you've wiped too much of your glaze off, simply go back and apply another coat. The glaze is slow drying, so you have lots of time to achieve your desired look.

After I've applied and wiped my glaze I like to go back over and "dry brush" 

Here I take a foam brush, $1 at Walmart, add a little glaze and then pat most of it off onto a rag.

Then I simply brush on where I want some added detail. This looks nice on raised edges where your rag probably wiped clean.
You can also dry brush wherever you want some light highlighting.

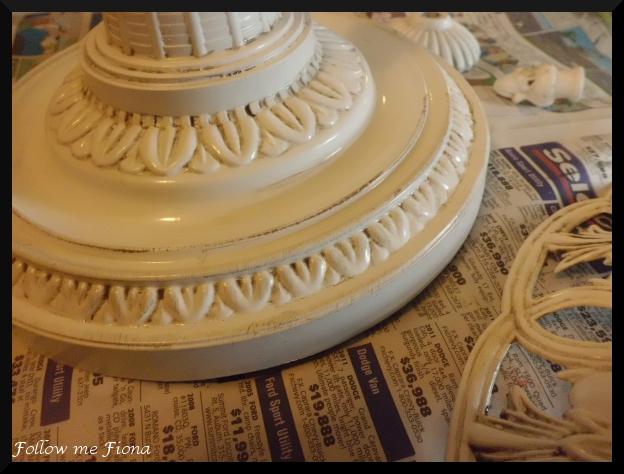
Here's my lamp all finished. If you wanted to add more dimension you could also give it a light sanding at this point, I left my lamp the way it is.

Here it is in the corner of my living room, next to the Xbox controller of course.

I hope this tutorial helps!

Friday, March 9, 2012

Thrift Store Frame Transformation

Today was SO amazingly nice out, (for Central New York in March that is) and Fiona took an awesome 45 minute nap this afternoon allowing me to work super quickly and revamp this frame! I picked up this frame a few weeks ago and it has just been sitting in a box waiting to be of use. I got the frame from.. you guessed it, Salvation Army. This time I paid a whopping $4.99. I really like the details on this bad boy


A couple of spots had some chipping, but I figured by the time I was done with it you wouldn't notice

I totally could have left it gold and it would have looked fine, but where's the fun in that! First I ripped off the backing to discover there were a million staples in it.

 Someone was seriously worried about keeping that pear in the frame.

There were so many staples, even after bending them all back, they just kept getting in the way of removing the glass. After many failed attempts at removing the glass without breaking it, I decided to just cover the glass in like 60 layers of newspaper.

Here it is primed, spray painted, and dried for a few hours. At this point I started having a serious dilemma of as to whether or not I should glaze the frame.


So I glazed half of it with brownish black glaze. (Valspar clear mixing glaze mixed with equal parts brown acrylic paint and black acrylic paint). I decided that I liked highlighting the details, plus I thought it would match the picture inside... but I'll get to that in a minute 


Close up of the details with the glaze, it really makes them pop.


I was doing this while these two slept on the couch (at 6:30pm I might add)
This picture is just too cute :)


Here's what I put inside! It's a sketch my sister made of Fiona, so adorable I just love it. Sorry I couldn't get the image to be clear without a glare. It was dark out when I took these pictures.. and my camera is not the greatest.

Here it is in the room. These walls look rather bare (and awkward) now that I am seeing them online!
I seriously have to do something about that very fake gold frame on the left. It does not match this room at all, perhaps I'll spray it a glossy black... some other day. 

What do you think? Have you revamped any thrifty finds lately?